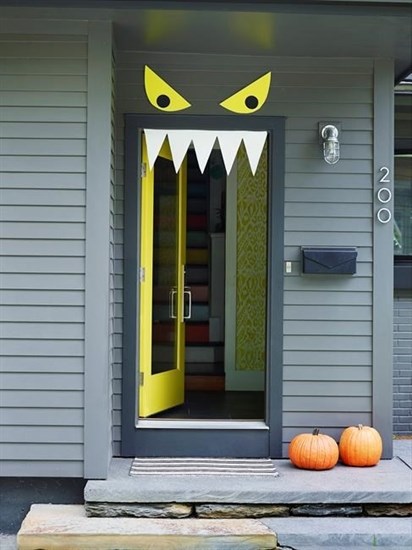
This photo provided by FamilyFun/Meredith Corp. shows the halloween decoration, "Nice to Eat You." Quickly make an amusing Halloween front door with craft foam: Using removable foam-mounting squares, attach pointy white teeth so they hang from inside the door frame and two large, yellow eyes with black pupils mounted above the doorway.
Image Credit: Alexandra Grablewski/FamilyFun/Meredith Corp. via AP
Republished October 18, 2015 - 8:33 AM
Original Publication Date October 18, 2015 - 7:00 AM
Want to display your Halloween spirit right at the front door?
These nine do-it-yourself projects are simple enough to be done by kids with an adult's help, and use easy-to-find supplies.
"The door to your house is basically the entrance to Halloween," says Susan Spencer, editor in chief of Woman's Day magazine. "It shows off your creativity . (the projects) really have to be easy and fun so they can be done together as a family."
Just keep Halloween decorating fun and spooky, not truly scary or gory, says Camille Smith, HGTV's managing editor. "You want it to be family-friendly," she says. "There's nothing worse than having a toddler scared."
___
NEW USES FOR POPULAR SYMBOLS
— Pumpkin Patch: Turn the front door into a giant, welcoming pumpkin. Cut orange wrapping paper and attach it to the front door. Cut oversize jack-o'-lantern features from sparkly gold wrapping or other paper and attach them to the orange paper with double-sided tape. To accent the door, place pumpkins of various sizes, shapes and colours on the stoop or porch, says Spencer, who also recommends glittering some.
— Cat's Eyes: Transform a string of orange lights into black cats, and ring them around the front door or windows. Download a template from FamilyFun magazine (familyfunmag.com/printables) and trace the cat-head shape onto black card stock (marking where the eyes are). Cut out several heads and use a hole punch to make the eyes. Insert bulbs from a string of electric lights into the holes. Laminate the black-cat cutouts against weather, or hang the lights indoors so they're viewable from outside.
— Skeleton bones: Take apart several large plastic skeletons and "frame" the front door with the bones. Use double-sided tape to attach them or wire them together like a garland. Add a string of lights or orange-and-black ribbon, says HGTV's Smith.
___
ALL EYES ON YOU
— "Nice to Eat You": This toothy door is simple but effective. From a sheet of white craft foam, cut a row of teeth that will fit across the top length of your door. Cut two large eyes from yellow craft foam and pupils from black craft foam. Staple the pupils to the eyes. Staple removable-foam mounting squares to the backs of each shape (FamilyFun used two squares for each eye and three near the top of the teeth). Adhere the eyes directly above the doorway and set the teeth so they hang from the inside of the frame or attach directly to the door.
— Eyes Everywhere: Cut pupils out of black felt and attach to white Styrofoam half-spheres (available at craft stores and online). Use removable tape to stick spheres to the front door, according to this Woman's Day craft. Make smaller "eyes," attach them to skewers and stake them into potted greenery around the door.
— Monstrous Wreath: FamilyFun says this wreath "will keep an eye (or 10) on your kids." Cut out the flat centre from a plain, white paper plate. Paint the remaining outer piece of the plate and let dry. Cut eight to 10 teeth from the discarded centre piece; glue the teeth to hang from the inside top of the ring into the open centre. Glue large and small white pom-poms (or cotton balls) onto the plate, then glue black paper circles for pupils on each pom-pom. Cut out and glue on two yellow paper horns at the "head" of the plate.
— Googly-Eyed Wreath: Use a hot-glue gun to cover a white foam wreath with pingpong balls, building up layers so the wreath is fully covered. (It takes 2 to 3 bags of pingpong balls, bought online or at a sports store, says HGTV's Smith.) Attach a small or large googly eye to each white ball. Attach the wreath to the front door with a metal or plastic hanger (rather than wrapping it in ribbon) to keep the wreath intact. "If you store it flat (so the balls don't dent), it never goes bad," says Smith.
___
WREATHS THAT DO DOUBLE DUTY
— Halloween Terra Cotta Pot Wreath: Cristina Ferrare, co-host of Hallmark Channel's "Home and Family," decorated a burlap-and-moss-covered wreath with tiny pots filled with faux succulents before adding the telltale Halloween items: skulls, spiders and glittery black branches. Supplies may be found at craft and online stores, and any wreath that can hold the heft will work. When Halloween's over, remove the spooky stuff and you have a pretty fall wreath for Thanksgiving. In the spring, the faux plants may be replaced with living succulents.
— Putka Pod Wreath: This wreath is covered with diminutive dried seed pods, called putka pods, that resemble tiny pumpkins. They are sold online and at craft stores. Smith hangs her wreath with a wide burlap ribbon for a rustic look that easily transitions into Thanksgiving. The dried pods are delicate but don't deteriorate, so this wreath, if stored carefully, may be displayed for years, says Smith.
___
Online:
www.hgtv.com/halloween
www.parents.com/familyfun-magazine
www.womansday.com
www.cristinaferrarecooks.com
News from © The Associated Press, 2015