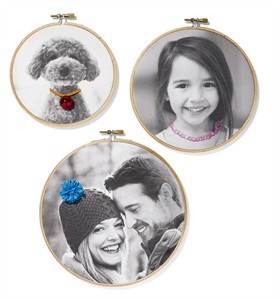
This undated photo provided by HGTV Magazine shows an easy do-it-yourself photo transfer holiday gift idea from the December 2014 pages of HGTV Magazine. Embellishments such as bells, beads or pom-poms add a personal touch. Find the craft's DIY instructions online at HGTV.com.
Image Credit: AP Photo/HGTV Magazine, Marko Metzinger
December 09, 2014 - 7:28 PM
Busy lives may require sacrifices, but forgoing handmade gifts for the holidays doesn't have to be one of them. We only need to plan well to have our crafts and give them away too.
Photo-transfer projects are perfect for this: They're generally fast, easy and inexpensive. Yes, you could order a tote bag printed with your pooch's photo, but why not make it yourself?
With products now on the market and some ingenuity, you can customize coffee cups, canvases and wood scraps.
"For our audience — the parents of young children — these are the kinds of gifts that grandparents and other family members love to get," says Laura Fenton, lifestyle director for Parents magazine. "It's a very affordable (way) to personalize gifts."
Nearly any surface can receive a photo transfer, according to Tracy Chou, a designer for Martha Stewart Crafts.
"There's nothing, really, that can't handle a transfer, and it's a great way for memory-keeping," says Chou, who has experimented with fabric, wood, glass, plastic, ceramics and metal.
Martha Stewart Crafts sells several decoupage products to help, but there are as many ways to transfer a photo as there are surfaces for adhering.
Karen Watson of Frederick, Maryland, assembled a dozen methods at her blog, The Graphics Fairy. She also provides hundreds of vintage images for downloading and suggests other do-it-yourself ways to use them.
You can download photos from Instagram, Flickr and other photo-sharing websites to personalize gifts for friends and relatives. Use a photo-editing feature — found on smart phones and on computer programs such as Photoshop — to give photos a vintage or dreamy look, suggests Hannah Milman, editorial director of crafts for Martha Stewart Living. Then print them on an ink-jet printer.
One of the simplest projects is using iron-on transfer paper, available at craft stores. Print a digital photo to the transfer paper and then iron it onto a fabric. Muslin or canvas bags are popular options, says Fenton, who suggests washing, drying and ironing the fabric before transferring a photo.
"You want to have a really smooth surface to work on," she says.
Other ways to transfer images to fabric include the Mod Podge method (cover the printing side of card stock with craft glue, allow it to dry, print the image and position it atop Mod Podge thinly brushed onto the fabric). That method also works on wood and ceramics, says Watson.
Or use wax paper to transfer images to fabric or wood. Martha Stewart Crafts' decoupage products include a Phototransfer Clear Finish for transferring an image to glass.
HGTV magazine suggests sizing a photo to fit inside a wood embroidery hoop. Print the photo in black-and-white onto a sheet of printable fabric, peel off the fabric's backing and place the fabric in the hoop, trimming any excess. Embellish with bells, beads or other decorations.
Milman likes using photos in black-and-white or sepia tones, and ticks off a slew of gift ideas:
— Gussy up an apron, tote, pillowcase, T-shirt, Christmas stocking or dish towel with an image or collage of images.
— Transfer a photo of each family member to napkins for use throughout the holiday season.
— Dress up baked goods in metal tins personalized with photo transfers.
— Decorate small or large wooden blocks — available at craft or home-improvement stores — with holiday-themed or family images to give as gifts or use as a table centerpiece.
— Transfer a photo to a pre-stretched canvas, available in many sizes at craft stores. Punch small holes through the canvas and insert mini-LED lights from the back to lend sparkle. With a nature scene or picture of the gift recipient's home, position so the lights become twinkling stars.
— Decorate glass ornaments, available in many shapes and sizes at craft stores, with family photos; consider adding images from vintage Christmas cards. Or use photos of your Christmas tree or front-door wreath, suggests Milman.
Other tips:
Choose photos with simple backgrounds, which "read" better, says Fenton, and crop photos to feature what you like best. Because the photo will print in reverse, you might want to flip it on the computer before printing it, especially if it contains words.
And increase the black-and-white or colour contrast before printing a photo onto transfer paper. It will look better, Fenton says.
Milman recommends doing photo-transfer projects with kids and sending everyone home with a T-shirt or canvas bag.
"Your photos are priceless memories," she says. "The projects are archival. They can be a treasure forever."
News from © The Associated Press, 2014